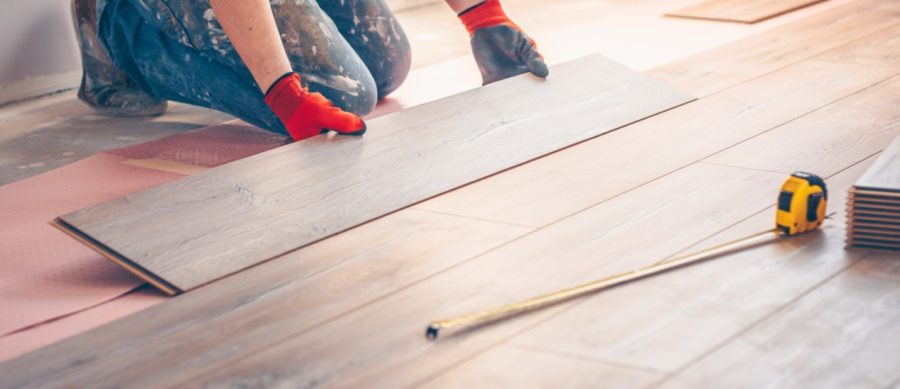
This laminate floor installation guide explains the process and will help you decide whether you want to do it yourself or leave the installation to home flooring pros.
Many DIY enthusiasts choose laminate because it is very easy to install. Most of the products simply snap together. There is no gluing or nailing of the planks.
Trimming around obstacles like floor vents and door jambs takes some skill and practice, but a good online tutorial will give you the confidence you can do it. See our other laminate flooring guides for more detailed information about maintenance and laminate floor prices.
Tools and Supplies the Pros Use
Along with basic hand tools most DIY’ers have, here’s a checklist of the various tools needed for installation:
- Power Tools: Circular saw or table saw, compound miter saw, jigsaw.
- Installation Tools: Hammer, Tapping bar, pull bar, heavy roller.
- Supplies: Foam or acoustic underlayment, expansion spacers
Preparing the Existing Floor
You’ll need to remove existing laminate flooring, baseboard, shoe molding, floor heating registers, and anything else fastened to the floor. The old flooring must be removed including tack strips and padding staples. A flat shovel is a good tool for removing staples, glue and other debris.
If the subflooring is in good condition, check for ridges and sand them down. If it is in poor condition, you may have to pull it up and replace it.
If the subfloor is in poor condition, you may have to pull it up and replace it before installing laminate flooring. Wood subfloor is unsuitable for laying laminate flooring on if:
- It is warped
- It shows significant mold
- It is crumbling
- It is infested with insects
- It has odor from pet stains
If the subfloor is concrete, the surface must be level. Patch chips and fill cracks in the concrete. Use a level to determine where it has settled and needs to be built up using self-leveling mix.
Installation Techniques
Knowing how to install laminate flooring begins with readying the material. The first thing to do is to allow the laminate to acclimate to the temperature and humidity conditions of the room. Lay the unopened boxes horizontally on the floor for 48-72 hours before you being installation. The purpose of this is to allow the material to gain the same relative humidity as the environment in which it will be installed.
Acclimating laminate flooring will prevent the material from expanding or contracting after it’s installed, problems which could lead to it coming apart or buckling.
Finally, before you begin to install laminate flooring, open 4 or 5 boxes of material and mix up the planks from them. This will blend the shading to give a more natural and random appearance. When you’ve reduced your open stock by half, mix in another couple of boxes. Continue with this strategy throughout the laminate installation.
Now, here’s a guide to DIY laminate flooring installation.
Step 1: Install a moisture barrier if installing the floor over plain concrete or tiles covering concrete. It should run wall to wall with sections overlapping 8”. Some installers use waterproof tape to seal the overlap areas. Moisture transfers through concrete quite readily, and moisture from the ground reaching your laminate will destroy it by causing warping, separation and mold.
Step 2: Here’s a tip for how to lay laminate flooring that has a ceramic tile or slate design. You want to lay it out so that there is an equal amount of trimming on either side of the room.
Therefore, measure the room in both directions. For width, divide the width of the room by the width of the planks you’re using. For example, if the room is 20’ 6” across, that’s 246 inches. If the planks you are installing are 10” width, you will install 24 full planks with 6” left over. Subtract one inch for ½” expansion spacers along each wall, leaving 5” of flooring still needed.
Rather than have a 5” board on one side of the room and a full board on the other, it will look better to have a 2 ½” board on either side of the room. Therefore, plan the row of planks along each side wall to be 2 ½” wide. If the laminate is tongue and groove, remove the tongue side from the first row and the groove side from the last row.
This step does not apply as strictly to laminate finishes simulating wood, but even then, it doesn’t hurt to employ it for a balanced appearance. When cutting planks from the first and last rows, leave room for the expansion spacers you can get from the laminate flooring dealer, and remove the spacers before replacing the molding.
Step 3: Start on the left side of the room from the most common entry point to the room. Complete the step above if you want to balance the width of the first and last planks.
If you’re not balancing the first and last rows, then trim the tongue from each plank that will be installed against the wall. Complete the entire length of the left wall by joining the short ends of the planks. The gap created by the spacers is needed for expansion that comes with higher humidity, and the gap will be covered by the shoe molding once the floor is installed.
Note: When you install shoe molding after the job is completed, be sure not to nail it to that it is tight to the laminate. This will prevent expansion and might cause the floor to buckle. It should sit 1/32” above the laminate.
Step 4: As you approach the end of the first row, measure the length the last piece needs to be and trim the piece to fit before installing it.
Step 5: For the start of the second row, cut a piece the same length as the last piece of the first row in order to stagger the end butts. Begin the second row at the same end of the room you started the first row. For subsequent rows, choose varying lengths for the first piece in order to achieve a more random look. Connect each piece with the one next to it by placing the tongue in the groove and pushing them together. Use the tapping bar to secure a tight fit.
Step 6: For trimming around floor vents, make your measures and pre-cut the boards before installation. A jigsaw is a helpful for making cuts to go around all types of obstacles.
Step 7: Continue with this technique until all rows have been installed. Use a pull bar to pull the pieces in the last row into the second to last piece for tight, secure connection. The pull bar is a handy tool whenever you can’t use the tapping bar.
Note on gluing laminate flooring: Laminate is designed to be a floating floor type. Some installers glue the pieces with waterproof glue to keep moisture from spills and cleaning from seeping into the flooring and causing swelling, cupping and separation. The most common areas for flooring to be glued is in bathrooms near the shower or tub, in a mud room where wet shoes are common and near entryways from the outside.
We recommend that you talk with your retailer about this technique or read the installation information that comes with your flooring before you employ it. You might also be able to find information on the manufacturer’s website. In some cases, nailing down or gluing laminate will void the manufacturer’s warranty, and it certainly makes replacing a damaged plank much more difficult.
Typically, cutting laminate flooring is the trickiest part of the installation, read our dedicated post for the best way to cut laminate flooring.
Finishing the Job
Once all the flooring is down, make sure that all the joints are secure. Then, reinstall the baseboard molding and other trim pieces.


Leave a Reply
Your email is safe with us.